Synology as a Private Photo Sharing Service A Visual Walkthrough
The past year’s turmoil and churn with photo storage services was a major motivation for me to get control of my own photo management. My primary goal was to develop a system that was service-agnostic. I wanted a file structure on a computer that I controlled and could easily be moved to a new sharing service if I needed to find another home.
I found a terrific solution in the most unlikely place: my NAS.
One of the pleasures of owning a Synology NAS is the regular discovery of new ways that I can use my existing hardware.1 The Synology management software (DSM) comes with many self installed add-ons. I recently hailed the new CloudSync option as an example.2 For this tutorial, you’ll need to install the Photo Station software available to most Synology owners.
What Is It?
Photo Station is a web service and application served by a Synology NAS. All files exist on the NAS in a folder hierarchy and are indexed by the Synology disk management software automatically. The web app can be made available to the Internet by enabling the Synology QuickConnect service or by using a DNS service to redirect to your NAS. This tutorial will not cover the setup for exposing your NAS to the Internet.
Imagine Aperture as a web app running independently on your NAS. That’s close to what Photo Station is.3
The Setup
The Photo Station setup is pretty simple.4 You login to the Synology admin web page and configure the media indexing service. Photo Station will automatically use the indexed photo share. I setup a separate volume on my Synology with all of my photos and configure the media service to index them. It’s important to note that this will be where new uploaded photos are stored by Photo Station. It all happens on the NAS with no Mac or PC required.
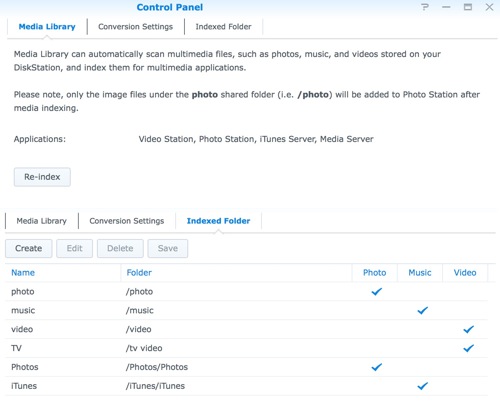
The Synology media indexing service runs periodically (you can adjust the timing) but new photos added through Photo Station are immediately indexed and made available in the web app.
Next, login to the Photo Station web app from the Synology admin page.5 If you are using the Synology QuickConnect service, then your Photo Station admin page can be accessed from a URL like this:
:::text
http://username.quickconnect.to/photo/admin_index.php
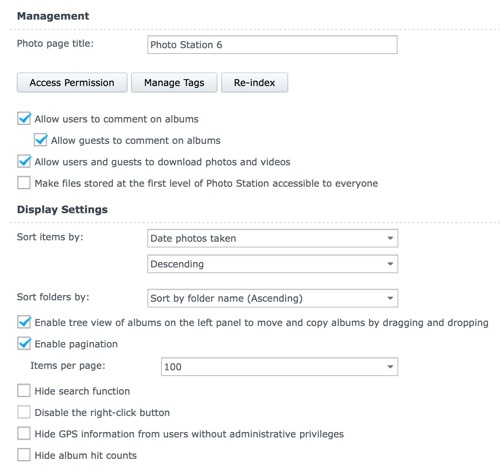
The Photo Station admin settings provide several levels of configuration. I first configured the layout and design of the interface.
You can also exclude image formats here, so that RAW and proprietary formats are not visible in Photo Station. By default RAW, tiff and HDR are excluded.
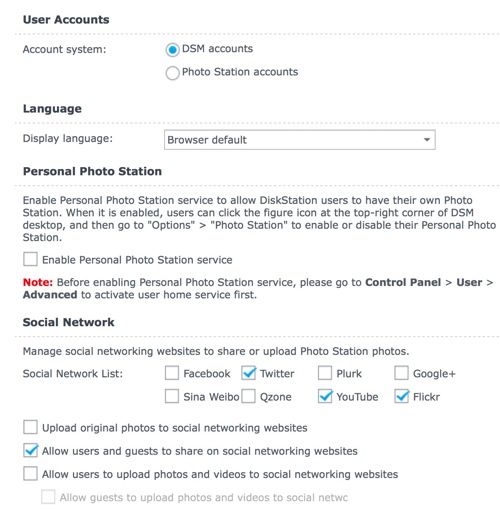
On the “General” settings page, you configure user authentication and sharing services. There are three ways to grant access to photos on Photo Station:
- Restrict access to Synology DSM user accounts
- Restrict access to Photo Station accounts
- Password protected access
Synology user accounts are configured through the Synology DSM web app and provide detailed control over how and what users can access on the NAS. This is just like setting up file sharing on any reasonably advanced NAS.
Photo Station users can only access Photo Station content. You can choose either Synology user authentication or Photo Station user authentication but not both.
Password protected folders can be shared to anyone that knows the password regardless of the authentication method. It doesn’t matter how users are authenticated.
There are also settings to control the way Photo Station looks. There is a light and dark theme and customization options for each.
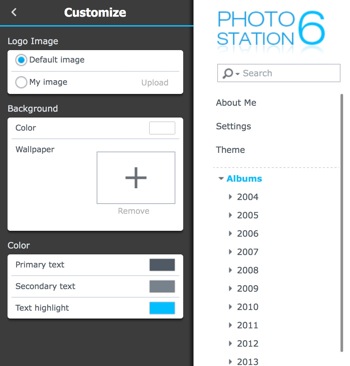
Overall, I like the way Photo Station looks at launch.
Photo Browsing
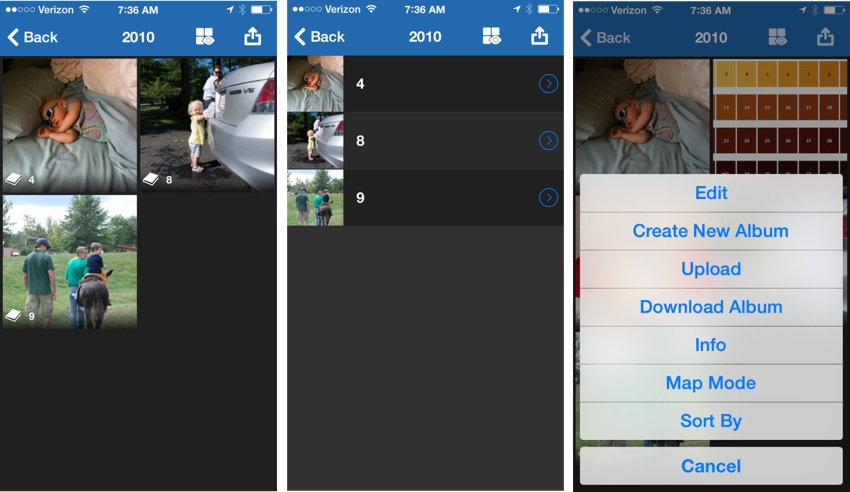
Browsing photos is not complicated in Photo Station. It’s a bunch of files in directories. But Photo Station provides some easy to navigate options. Browse the folders in a hierarchical pane as albums and view them in the “Photo Wall” mode as a grid. The photo wall provides drag and drop of images to reorder or to move between albums.
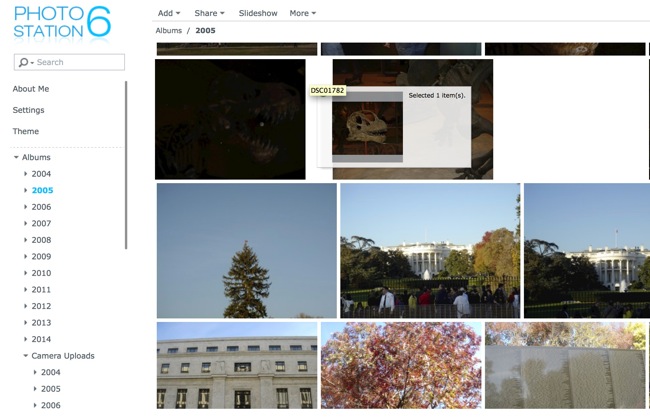
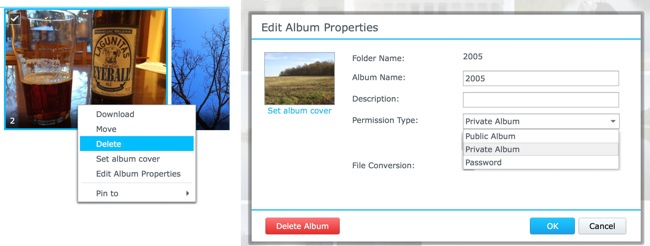
Right click an album to adjust the properties such as the cover photo and privacy level. There’s also an option to assign an album name that is different from the folder name.
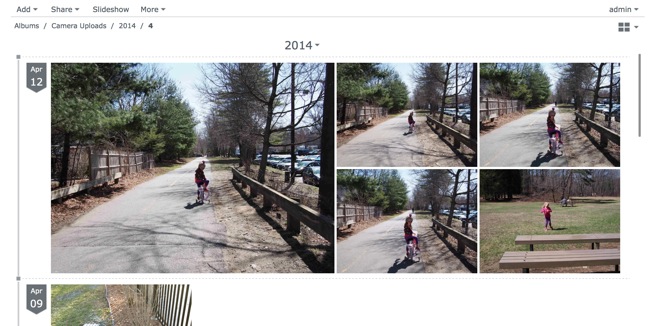
Or pick a folder and browse the timeline. In timeline mode, a few representative images are use and events are separated by day. I organize my photos by year/month and the timeline view doesn’t add a lot for me. I can quickly get to a specific month and then browse using the “Photo Wall” view.
The map view is a bit slow, but provides on of the features I liked about Flickr. Photo Station generates a Google Map with pins based on photo geo-location meta data. Note that this works with all sub-albums too.
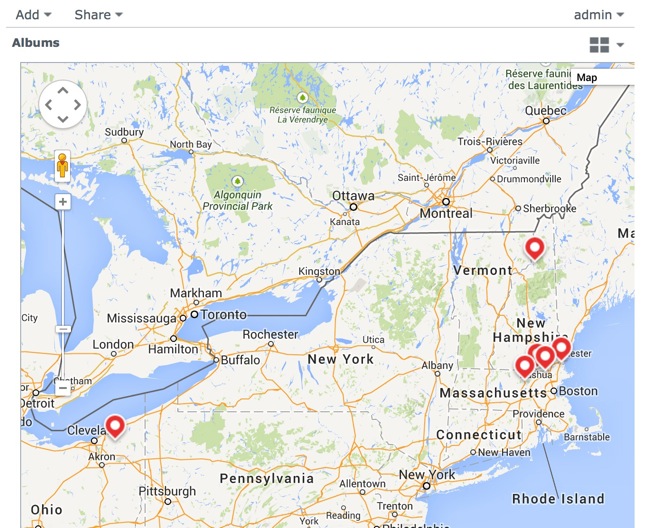
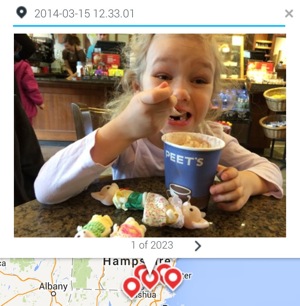
Each pin aggregates the photos for the same approximate location. Clicking on a pin provides a quick image browser. Clicking an image opens the image in detail mode.
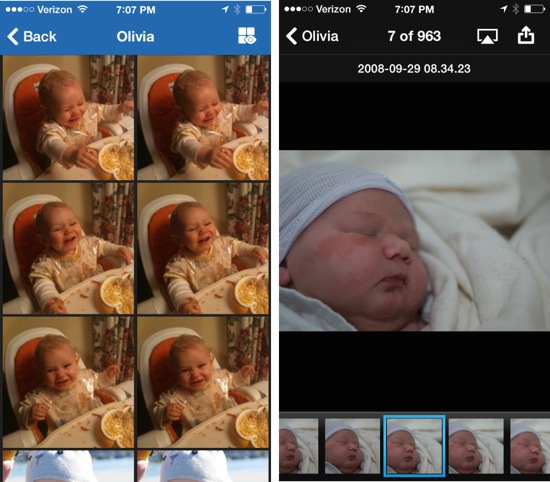
Detail View
Photo browsing in Photo Share is up to snuff with most of the photo management services I’ve used over the years. But the photo detail view is far better than most. The detail view in Photo Share has more in common with Aperture or iPhoto than it does with Loom.
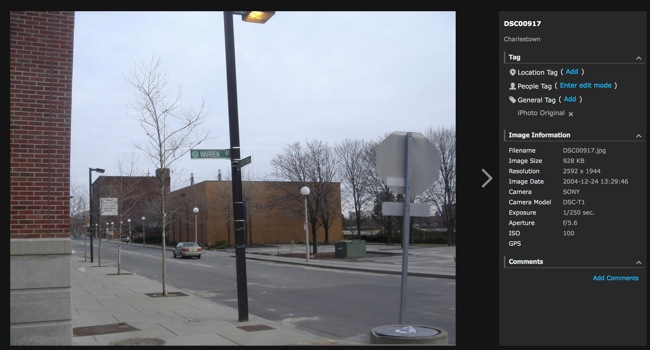
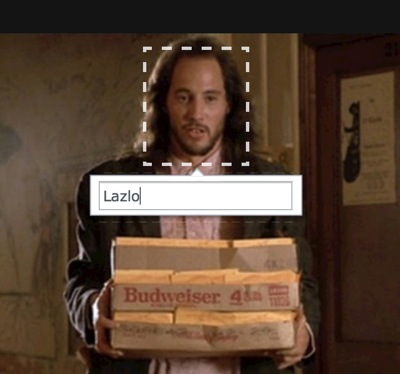
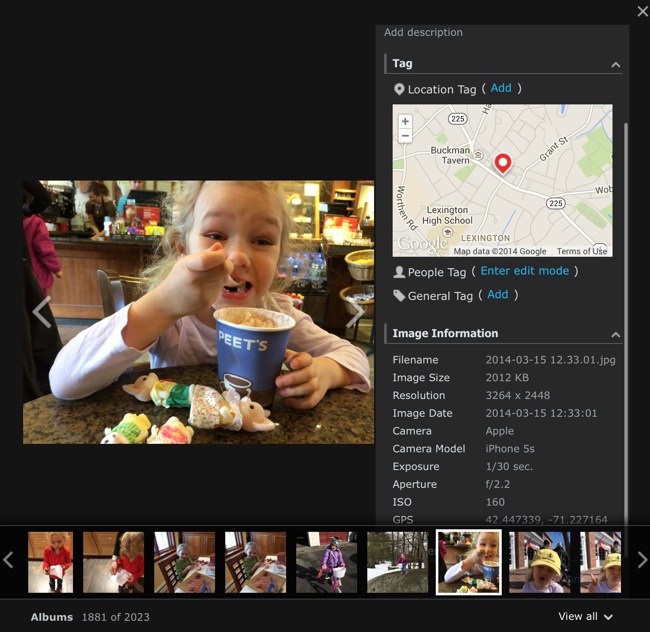
The image EXIF data is available for viewing in Photo Share. Tagging is an integral part of Photo Share and it’s as easy as it gets. General tags can be entered with autocompletion and there’s manual face tagging.6 All of the tagging is worthwhile since it makes search useful.
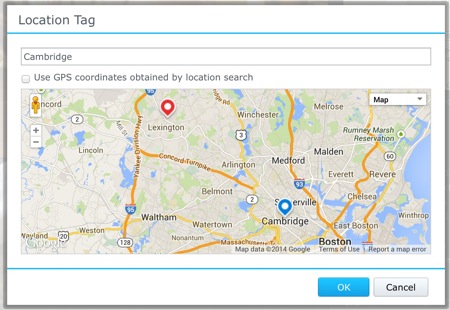
Geo-location is displayed on the detail view and is adjusted with a nice little map interface that also includes location search.
The familiar album ribbon is also accessible in the detail view, which makes it ideal for manually tweaking entire albums of photos.
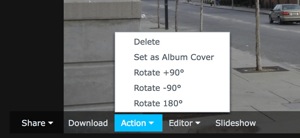
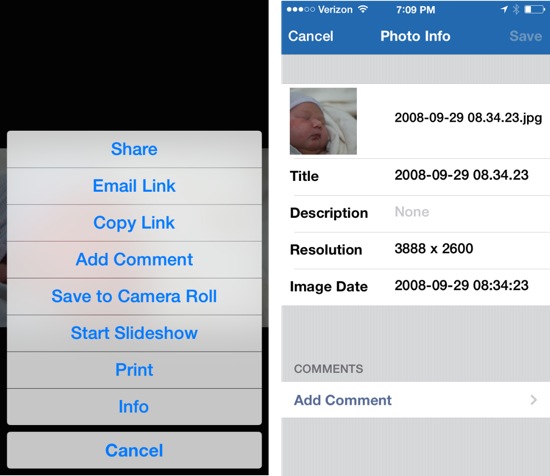
Basic image correction controls are available in the detail view. Images can also be deleted or assigned as an album cover directly from the detail view.
But Photo Share really sets itself apart with the integrated image retouching tools. There are three different editor options available at any time, Aviary, Pixlr and Pixlr Express. Pixlr requires Flash so I don’t use it.
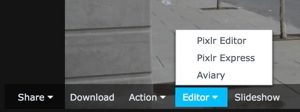
Aviary is outstanding and integrates seamlessly into Photo Share. The editor is impressively complete with all of the basic requirements for image retouching.7
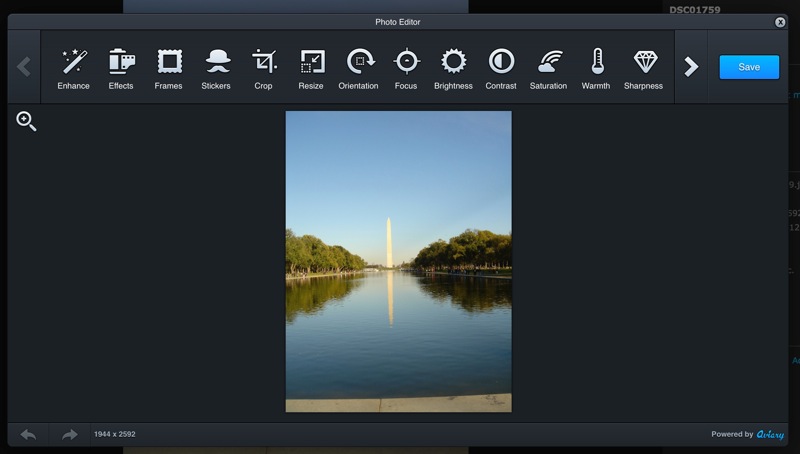
Edits are non-destructive and require you to save a new version. There’s no worry about destroying the original.
My only complaint with the detail view is that there is no way to manually edit the EXIF data for a photo. I’d like to correct things like the dates on scanned photos.
Search
Photo Share provides a basic global search and an advanced attribute search. While searching is very fast, there are limited attributes to query against. If you want to use focal length or camera type as a search, you are mostly out of luck. For my needs, this is more than enough.
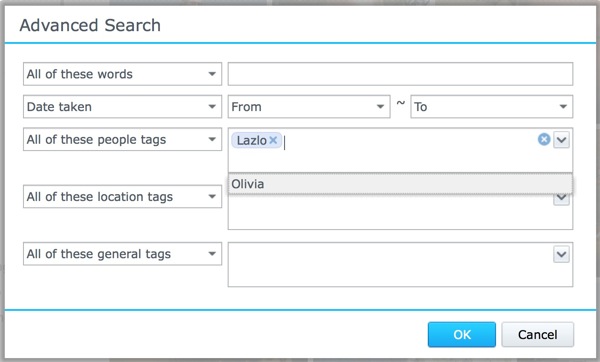
The general search will return albums and photos that match and any search expression can be saved as a smart album. This works great with the face recognition and tagging.
Sharing
As mentioned earlier, photo access can be restricted in several ways. I generally share photo albums with a password for family and friends. They follow the link and access the entire album with the password that I sent them. They can browse and download photos but can not edit or delete anything. Conveniently, there’s no user account required.
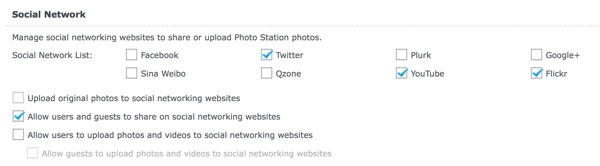
Photo Share also provides sharing through social services like Flickr. I haven’t used many of the options but I’m sure they are valuable sharing services for someone.
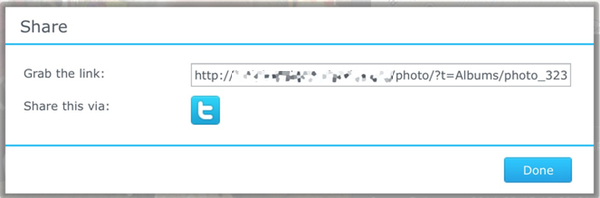
My preferred way to share a single photo with Photo Share is through a directly generated link. The link can be emailed or sent any other way a URL can be shared. The URL’s are very long and ugly but they do work and they respect the access permissions set for the photo or album. If you have public photos, anyone can visit the Synology QuickConnect link to view them too.
Access control for individual photos is inherited from the album. If the album uses password access then the photo can also be viewed with a simple password.
One of the features that made it hard for me to find a good service for sharing photos with my family and friends, was commenting. I wanted the option for comments without requiring my mom to sign-up for some new service. Photo Station provides a straightforward method for adding comments. If they have access to the photo then they enter their email address, name and the comment.
When a comment is added to a photo, I get a simple email alert.8 The comments are visible to anyone with access to the photo.

The integrated sharing with services like Flickr is simple but manual. After linking Photo Station with my Flickr account, I just selected the photos in the Photo Station browser and chose Flickr from the sharing menu. It’s simple but it would be nice if there was a way to automatically sync photos between a specific album and Flickr automatically. I’d also love the option for Photo Station to directly import photos from various social services like Twitter. If I were more social this would bother me more.
There’s also an option to configure a Photo Station blog service that provides something more appropriate for a travel diary. One blog is more than I ever wanted, so I didn’t really try this option. I’m sure it’s great based on the rest of the Photo Station software.
If you’re feeling really generous, you can also grant every DSM user their own Photo Station. I could see using that for an entire family while also keeping the photos segregated. I also did not try this feature because I’m not that generous and no one in my family would want their own anyway.
Mobile Apps
The iOS app for Photo Station is called DS photo+ and just like Photo Station, it is surprisingly good. It’s a free universal app packed with some useful features and a not-terrible design.
The basic operation of the app is simple. You connect to your Synology either by the DNS redirect you configured or using the Synology QuickConnect credentials. If your Synology is setup to be accessible over the Internet then DS photo+ can access your photos over the Internet too.
Albums and photos are accessible through simple navigation as well as search. Browsing is obvious and supports swipe between images. Albums are viewed as either grids or a as a large image with a navigator ribbon below.
There are a lot of options for using a photo in DS photo+. The “share” function activates the standard iOS open-in sharing panel. URLs for photos and albums are copied or emailed with only a couple of taps. There’s even access to AirPlay for displaying a single photo or a slideshow through an AppleTV.
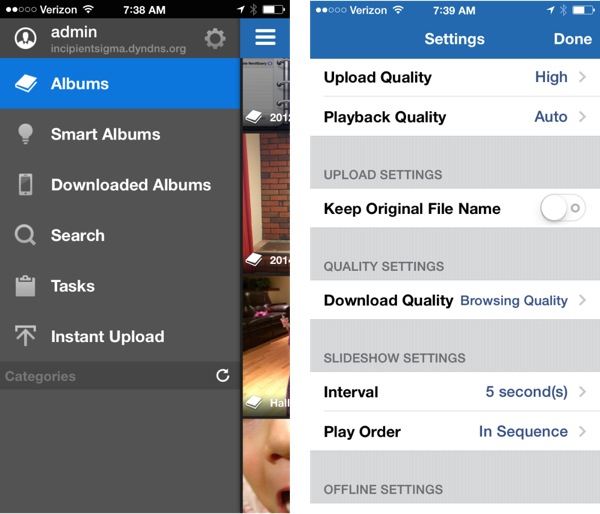
DS photo+ has the typical photo app settings. Options to control file size and tweak slideshow settings are nice but not unexpected.
Perhaps the best feature of DS photo+ is the option to automatically upload new camera roll photos to the Synology and Photo Station.
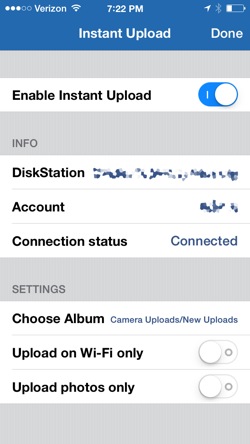
Whenever the app is launched, new photos from the iPhone or iPad camera roll are automatically uploaded to a specified directory on the Synology NAS. I’d like to see an option for defining a way to automatically sort photos into date formatted sub-directories. But I have a Hazel rule to easily manage this task when I’m back on my Mac.
It’s also worth noting that Photo Station supports videos as well as photos. Videos are organized and tagged just like any other files. They are also played and linked through the Photo Station web app and DS photo+ iOS app. Sadly, animated GIFs are not supported.
Cloud Backup
Until recently, I used Amazon Glacier to backup my photos on the Synology drive. Synology makes this easy. It’s just another DSM app that automatically handles the uploads. In the past couple of weeks I’ve added a backup to Google Drive through the new Cloud Sync service on Synology.9
I also clone the file share to an external drive periodically.
Conclusion
I didn’t buy my Synology NAS to be a photo storage and sharing solution, but now that I have it, I’m thrilled. It’s certainly a compelling selling point when looking for a backup device. I might even go so far as to say that it’s a good reason to get a Synology even if you were not looking for a NAS.
-
That’s an affiliate link for the DS1813+ 8-bay NAS (which is the replacement for my older DS1812+ model). It’s a monster and completely awesome. If you want to dip your toe in the water, I’d suggest the DS412+ 4-bay NAS. It’s cheaper but also well equipped. The 2-bay models are less powerful and I have no idea how well they would work for Photo Station. ↩︎
-
I’ve written a review of the Synology 8-bay device and also discussed using a Synology as a Plex server. ↩︎
-
Except with regular updates and it doesn’t kill the CPU. ↩︎
-
This tutorial was edited to be concise and to use images in place of verbose descriptions. After running a blog with comments for many years, I appreciate that only a vanishingly small percentage of visitors read all of the words. They probably didn’t read this footnote either. ↩︎
-
Of course you can bookmark this page after the first time. ↩︎
-
There’s an experimental feature for automatic facial recognition and tagging. ↩︎
-
I’ll never understand people that use stickers, frames and effects. To each their own, but I’ll leave that stuff for tweens in the mall photo booths. ↩︎
-
My favorite part is how sincere Photo Station is. Such polite software. ↩︎
-
It’s worth remembering that Google is likely crawling and indexing photos added to Google drive, including the EXIF meta data. That’s what advertising companies do. ↩︎