Some Obsidian Shortcuts and a Macro
One major shortcoming of Obsidian is that it does not integrate well with macOS or iOS so there are no conveniences for capturing text into an Obsidian note. I decided to learn a bit about the Obsidian URL scheme (which works on macOS and iOS) and create some Shortcuts to fill in the gap.
New Obsidian Note
This is a simple Shortcut that has one purpose: Give me a simple and convenient window to create a new Obsidian note on macOS and iOS. Let’s dive in.
Here’s the Shortcut code:
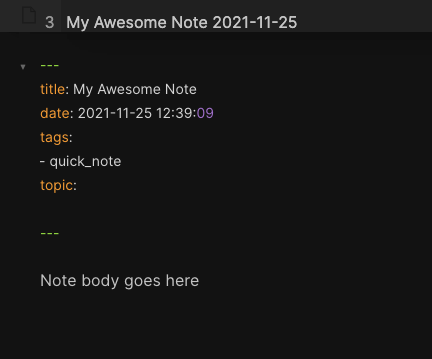
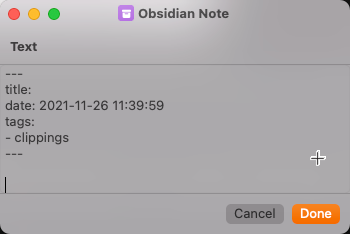
My basic note template in Obsidian looks like this:
Most of my Obsidian file names are a combination of the note “title” and a time stamp.1 This helps me in a couple of ways. It reduces the chance that I will try to create two notes with the identical file name and it gives me some context of the note age when I am browsing or searching for notes.
I also capture the timestamp as meta data in the note YAML. If Obsidian has done anything to improve my notes it has been to push me to be more consistent with front matter.
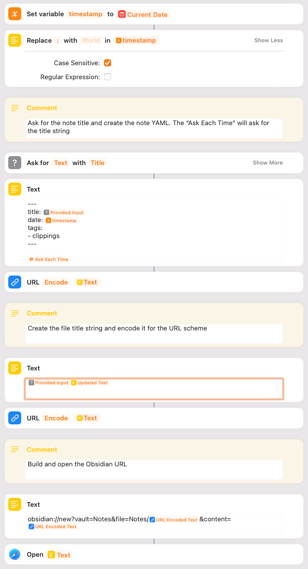
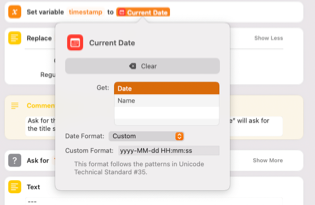
The Shortcut starts by creating the all important time stamp using a custom time format. This will be used in the YAML meta data.
But Obsidian does not allow colons in file names so I remove those with the Replace action. Now I have timestamps in a format for the file name and for the YAML data.
Next I assemble the content for the note, including all of the front matter. There’s not much special here except using the “Ask Each Time” variable. This will cause Shortcuts to open a prompt asking for some text. This means the Text action is also an Ask action which is a bit more tidy.
After this action the Shortcut has to URL encode everything and build a URL using the Obsidian URL scheme.
The syntax of the URL scheme is pretty readable so I won’t belabor what’s going on. Here it is:
obsidian://new?vault=<name of the vault>&file=<Name of Note with full PATH>&content=<URL encoded note body>
When this Shortcut runs I get two prompts:
- A prompt for the note title, which is optional
- The body of the note
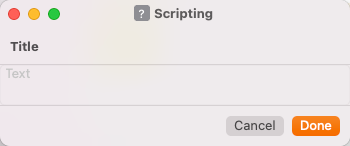
The note title is optional because if I don’t want to bother thinking of a title the note is named with just the time stamp. On macOS the first pop-up looks very simple. One annoyance with the Shortcuts “Ask for Input” action is that there is no way (that I’ve found) to choose the “Done” button without a mouse. It’s yet another rough edge that tells me Shortcuts was not ready for macOS.
After asking for the title the Shortcut shows another popup asking for the note and showing the front matter in case I want to edit it. This is all I really need for most of my short notes.
 The last few actions create the note title and then URL encode everything so it can be used with the Open URL action.
Backlog
- Strip bad characters from title before encoding
- Figure out a way to click “Done” with a keyboard
Clip From Browser to Obsidian (macOS)
This macro makes me sad. Apple does not provide a share extension from Safari into Shortcuts on macOS so I had to make this automation in Keyboard Maestro and in Shortcuts for iOS. It just works.
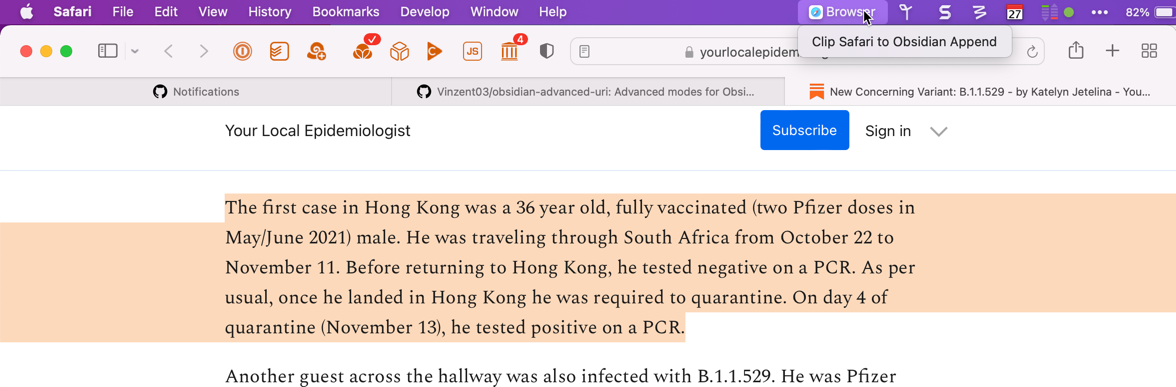
These macros have one use case: When I am reading something in a browser I want to capture notes with a link to the article. I may want to capture multiple notes for the same article in a single note.
Keyboard Maestro
For this macro I’m using the new Keyboard Maestro “Display in menu bar” feature for macro groups. I created a “Browser” macro group and enabled it for my web browsers.
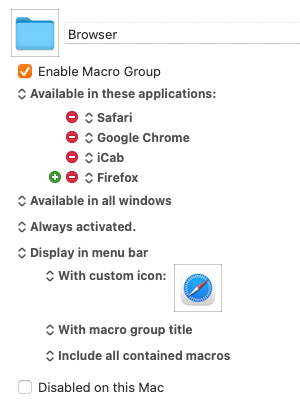
I like this new Keyboard Maestro feature. The menu disappears when I’m not working in a browser but is magically there when I need it again.
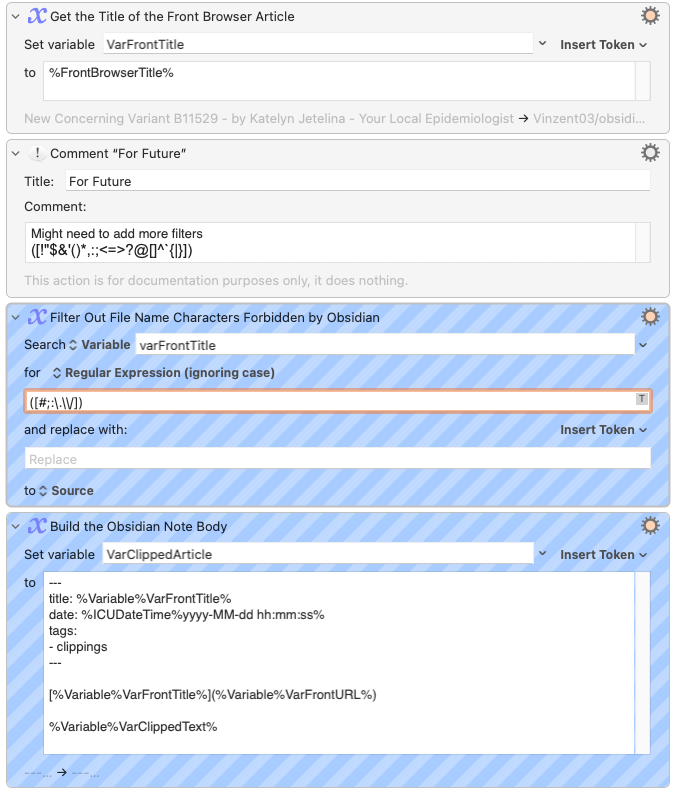
The macro looks like this:
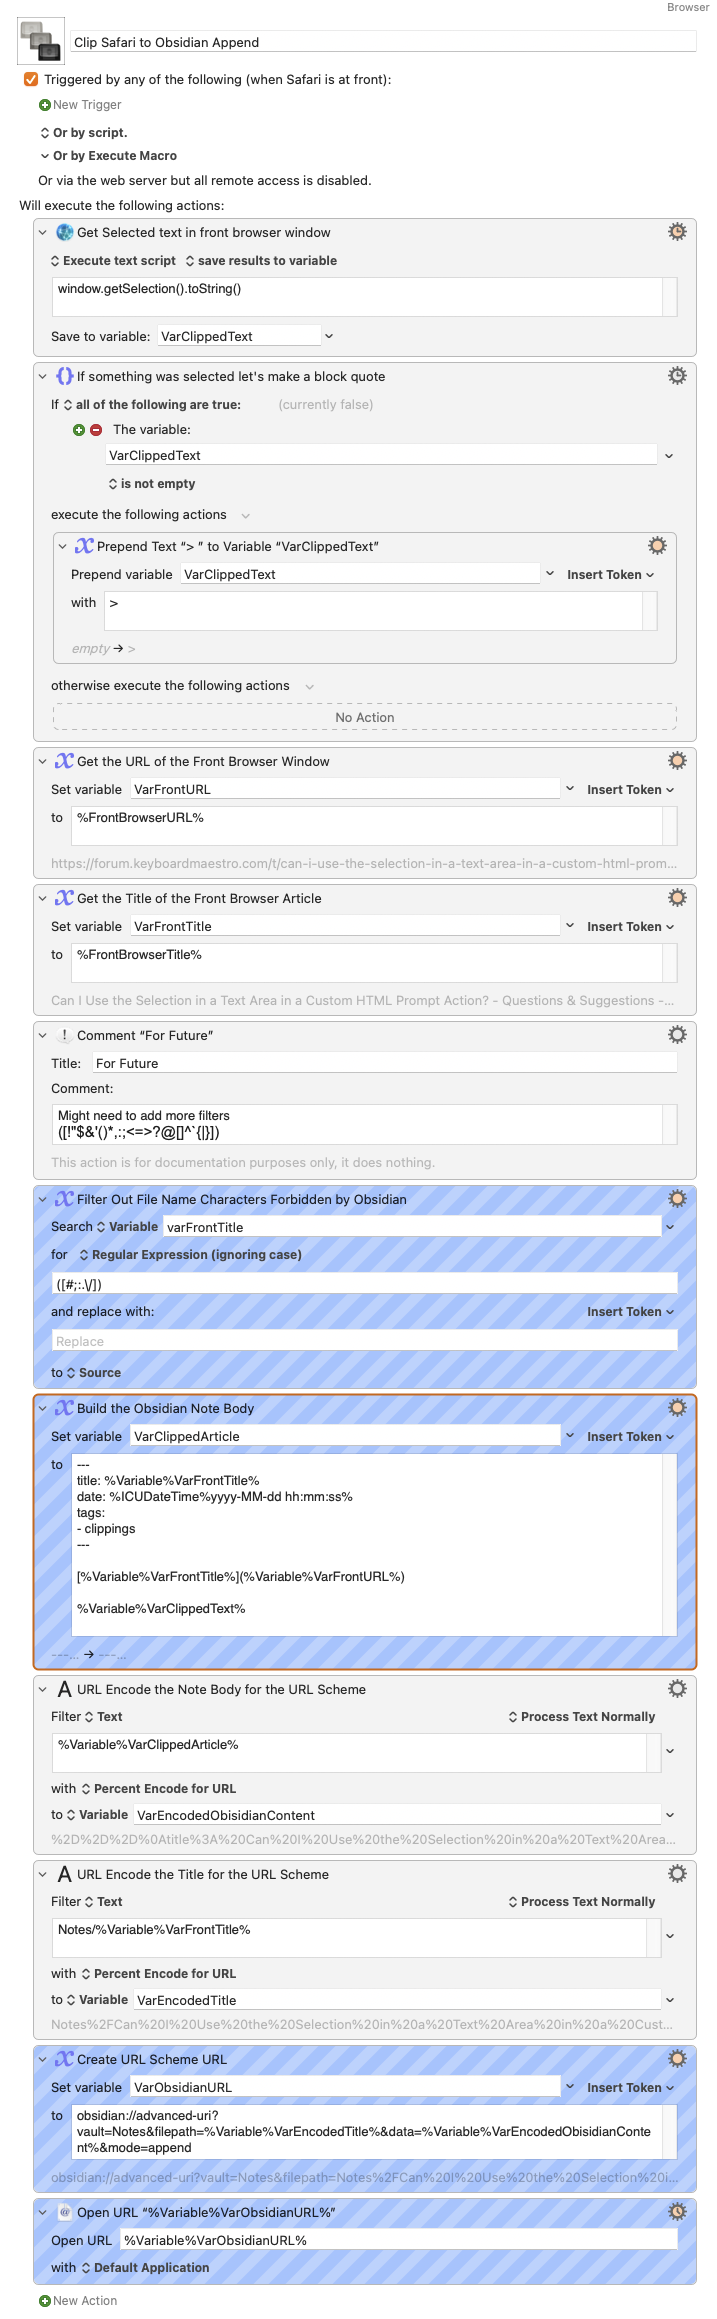
The first action grabs any text that is selected in the front browser window using a bit of JavaScript and saves it to a variable:
1window.getSelection().toString()
The next couple of actions test to see if we got something with the JavaScript and if we did then it prepends the text with the Markdown quote block format.
Next we grab the URL and Window Title from the front browser and save those as variables. We will use these to create the note but we need to do some tweaks on the title before we can use it as our note name.
I want to be able to append multiple different text selections to the same note. The Obsidian append handler will do exactly that as long as I know the exact name of the note. So I decided to use the Window title for the note name. This is slightly risky for two reasons:
- The browser window title may have characters that are illegal for an Obsidian note title
- The browser window title may not be unique in my list of notes
I can solve the first problem by stripping out illegal characters using the KM Filter action and replacing the characters with nothing using the Filter action.2
After I have the title, the URL, and the selected text from the front browser window, the macro builds the note body, including the YAML front matter. The final bit of the macro is to URL encode the title and the note body before calling the Obsidian URL scheme to create the note. Notice that I also snuck in the path to where I want my notes saved, the creatively named “Notes” folder of my “Notes” vault.
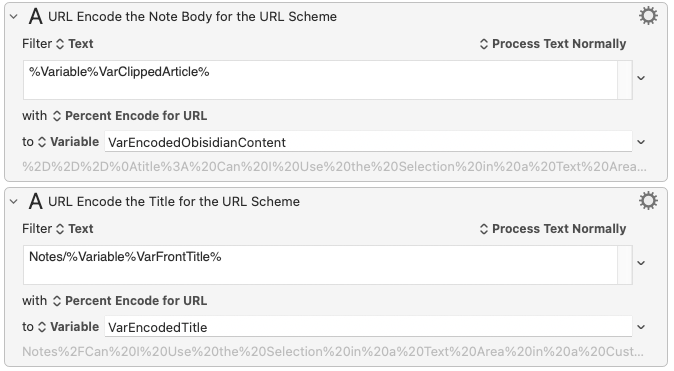
With everything locked and loaded we can construct the URL using the all important mode=append attribute. To use this we need to install a new Obsidian plugin called “Obsidian Advanced URI” which is available in the community plugin collection. The append mode causes Obsidian to append the data value to a note with the filepath (including file name). If the note doesn’t exist then Obsidian will create it. If the note does exist then the new content is appended.
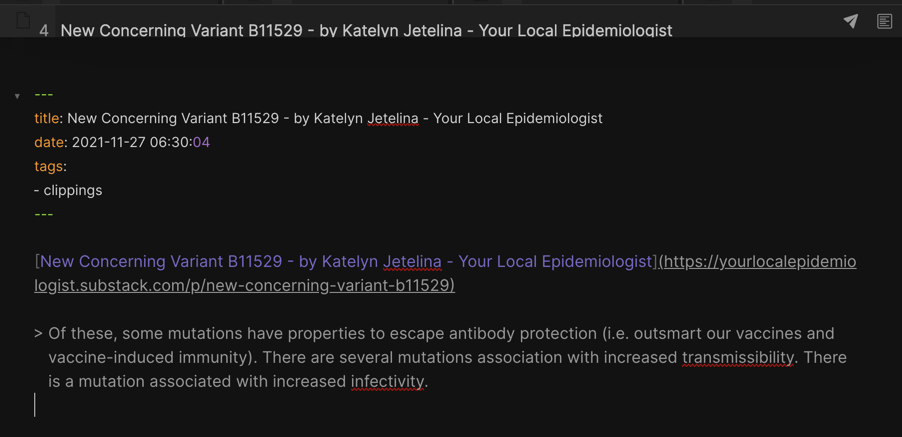
This is what a clipped note looks like:
I can clip as many times as I like. As long as the article title doesn’t change the new clips will append to the same note in Obsidian. This is what it looks like with multiple clippings:
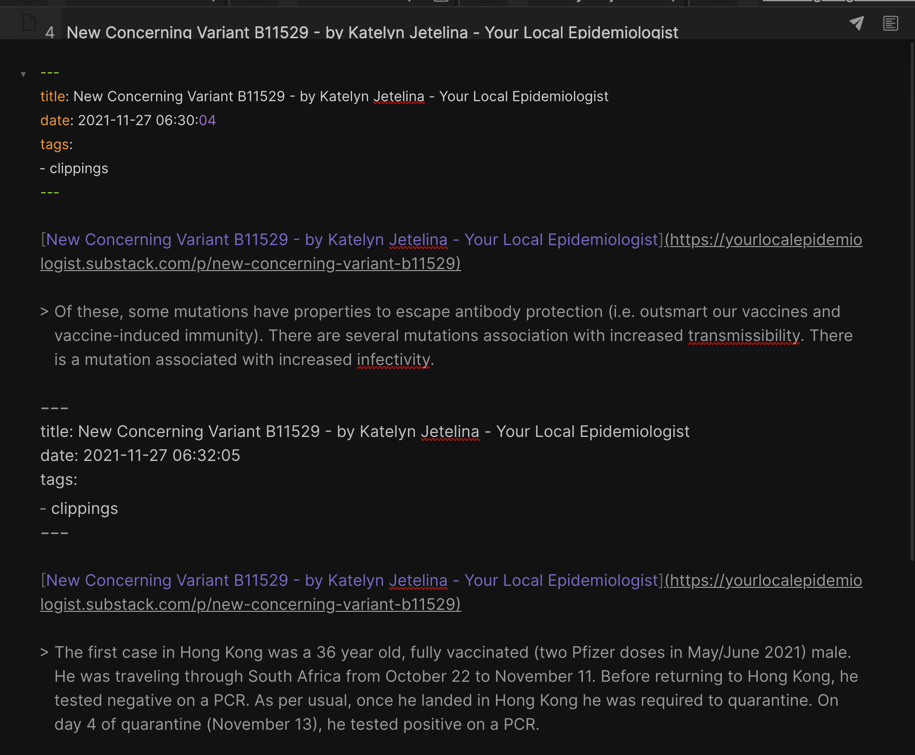
I’m not thrilled with the duplicated YAML but it also doesn’t hurt anything. Dataview still works fine and the purpose of the note is still satisfied.
Conclusion
My main conclusion for this macro is that Shortcuts is still not for macOS. But that’s OK because Keyboard Maestro is 1000x more sophisticated and yet easier to program in many ways.
My non-cheeky conclusion is that file identity in Obsidian is a bit muddled still. The uniqueness of the file name and path is not a great way to identify notes for appending, especially if I’m not in control of the file name. Webpage names can be complex and include unexpected characters that aren’t supported in Obsidian file names and maybe those aren’t the best way to identify an article uniquely.
Finally, this macro could have also been done without the URL scheme. Since Obsidian on macOS is backed by a folder full of text files I could just as easily manipulate the text file directly. But I wanted to learn more about the Obsidian URL scheme. I also now have a method that I can use with Obsidian Sync on iOS which doesn’t have the folder of up to date files to use.
Backlog
- Better handling for characters that break URL encoding of clipped text
- Logic to not include YAML if file exists in Obsidian
- Make it compatible with the Shortcuts version for iOS
- Include images (encode) with clip
Clip from Safari to Obsidian (iOS)
Here we are, repeating our work so that we can use iOS and macOS together, seamlessly. We’re going to use what we learned about the URL scheme but otherwise the Shortcuts version is a new solution. Here’s the Shortcut, which is expecting to receive input through the Safari share sheet.
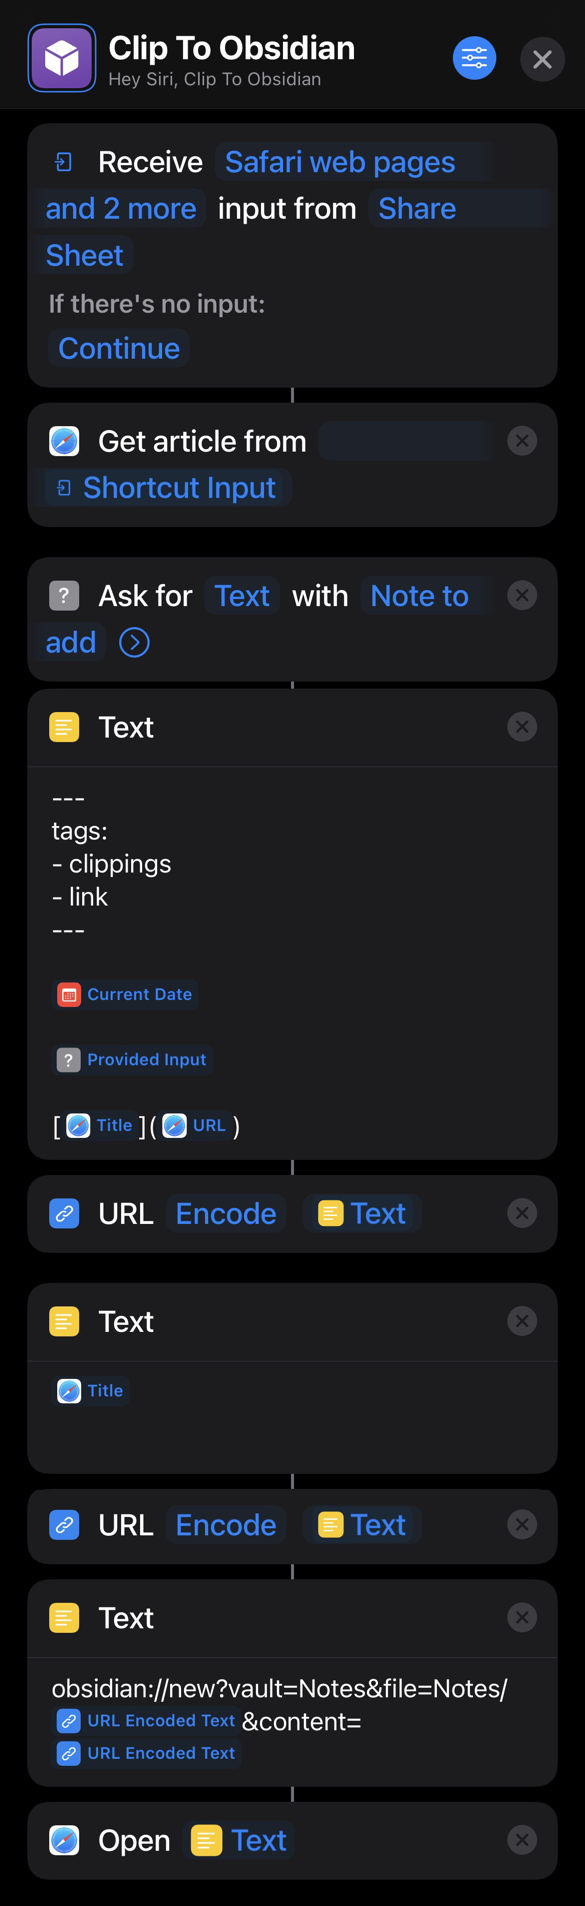
There’s not much unique going on with this Shortcut. It uses all the same patterns as the Shortcut at the top of this article plus the added RegEx replacement for the title of the document we used in Keyboard Maestro. The big problem is that Shortcuts does not use the same title element as Keyboard Maestro. I honestly have no idea how Shortcuts decides on the title for a Safari page. After some testing it’s clear that Keyboard Maestro is doing the logical thing and Safari is doing something else. For example the source for our example clearly shows the title which includes the byline and the subtitle:
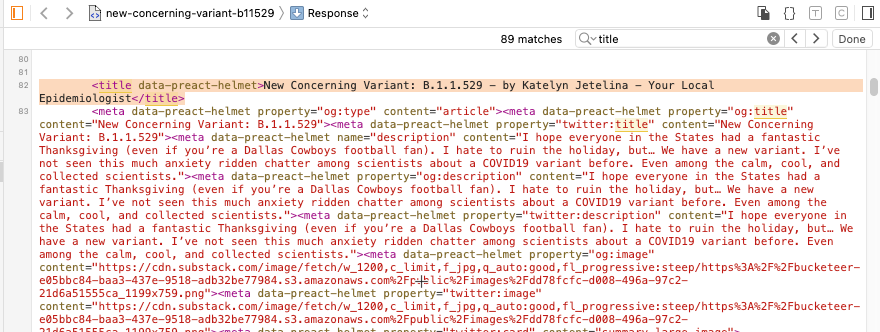
Shortcuts extracts the title without the byline or subtitle. This means that the Shortcut and Keyboard Maestro macro are not interoperable. I can not reliably append to an Obsidian note on iOS that I created from clipping a webpage on macOS.
Conclusion
I’ve tried to use Shortcuts on macOS and it feels like mistake. While I love the idea of cross platform automation I’m like to use Keyboard Maestro on macOS and Shortcuts on iOS. Or I need to lower my expectations for what I automate so that it fits within Apple’s capabilities.
Backlog
- Capture the same title as Keyboard Maestro (switch to JS)
- Update RegEx for title cleaning to be less permissive
- Standardize with Keyboard Maestro macro functionality
Summary
I’m really impressed by what the Shortcuts team at Apple has done but the migration to macOS is a disappointment for me. It’s the only automation platform that can truly be cross functional within the Apple device universe and yet it suffers from incomplete implementation on the macOS platform. Shortcuts on macOS lacks any developer sweetners and instead feels more like a proof of concept.
On the other hand, Keyboard Maestro goes deep on macOS. And it has documentation. For now I think I’ll keep using Keyboard Maestro for heavy lifting on macOS.