The Power of Pythonista 1.2
I like Pythonista (previous review) and I was impressed with the previous update. Pythonista is a well designed implementation of Python on iOS that goes far beyond just being a dumb shell. The developer, Ole Zorn, has a new release out today that raises the bar considerably.
This post will serve as an introduction to some of my favorite new features of Pythonista but also as a practical guide to how I use it.
The Basics
There’s some small but important improvements worthy of mention:
- iPhone 5 support
- Extended keyboard. New keys are available by press and hold action
- Color picker now has HTML-style colors
- Adobe Source Code Pro font option
- Scripts can now run with command line arguments
- Better exception notification
- External keyboard shortcuts to Run, Switch from editor to prompt and toggle search
But there’s much more to this release.
Clipboard Access
Access to the iOS clipboard has always been part of Pythonista but version 1.2 expands on it. Now images can be accessed and pushed to the pasteboard too. There’s also better text handling for strings (or at least it feels better).
Here’s a blatantly stolen version of Dr. Drang’s MultiMarkdown table normalizer. Put an ugly MultiMarkdown table on the clipboard and run this script to have a pretty MMD table returned.
:::Python
#!/usr/bin/python

import clipboard

def just(string, type, n):
    "Justify a string to length n according to type."

    if type == '::':
        return string.center(n)
    elif type == '-:':
        return string.rjust(n)
    elif type == ':-':
        return string.ljust(n)
    else:
        return string

def normtable(text):
    "Aligns the vertical bars in a text table."

    # Start by turning the text into a list of lines.
    lines = text.splitlines()
    rows = len(lines)

    # Figure out the cell formatting.
    # First, find the separator line.
    for i in range(rows):
        if set(lines[i]).issubset('|:.-'):
            formatline = lines[i]
            formatrow = i
            break

    # Delete the separator line from the content.
    del lines[formatrow]

    # Determine how each column is to be justified.
    formatline = formatline.strip(' ')
    if formatline[0] == '|': formatline = formatline[1:]
    if formatline[-1] == '|': formatline = formatline[:-1]
    fstrings = formatline.split('|')
    justify = []
    for cell in fstrings:
        ends = cell[0] + cell[-1]
        if ends == '::':
            justify.append('::')
        elif ends == '-:':
            justify.append('-:')
        else:
            justify.append(':-')

    # Assume the number of columns in the separator line is the number
    # for the entire table.
    columns = len(justify)

    # Extract the content into a matrix.
    content = []
    for line in lines:
        line = line.strip(' ')
        if line[0] == '|': line = line[1:]
        if line[-1] == '|': line = line[:-1]
        cells = line.split('|')
        # Put exactly one space at each end as "bumpers."
        linecontent = [ ' ' + x.strip() + ' ' for x in cells ]
        content.append(linecontent)

    # Append cells to rows that don't have enough.
    rows = len(content)
    for i in range(rows):
        while len(content[i]) < columns:
            content[i].append('')

    # Get the width of the content in each column. The minimum width will
    # be 2, because that's the shortest length of a formatting string and
    # because that matches an empty column with "bumper" spaces.
    widths = [2] * columns
    for row in content:
        for i in range(columns):
            widths[i] = max(len(row[i]), widths[i])

    # Add whitespace to make all the columns the same width and
    formatted = []
    for row in content:
        formatted.append('|' + '|'.join([ just(s, t, n) for (s, t, n) in zip(row, justify, widths) ]) + '|')

    # Recreate the format line with the appropriate column widths.
    formatline = '|' + '|'.join([ s[0] + '-'*(n-2) + s[-1] for (s, n) in zip(justify, widths) ]) + '|'

    # Insert the formatline back into the table.
    formatted.insert(formatrow, formatline)

    # Return the formatted table.
    return '\n'.join(formatted)

# Read the input, process, and print.
unformatted = clipboard.get()
formatted = normtable(unformatted)
clipboard.set(formatted)
print(formatted)
PIL
PIL is an impressive Python library. It can do a hell of a lot with an image. It can extract data and manipulate an image in almost any way. PIL is now available in Pythonista and it is ridiculously easy to use.
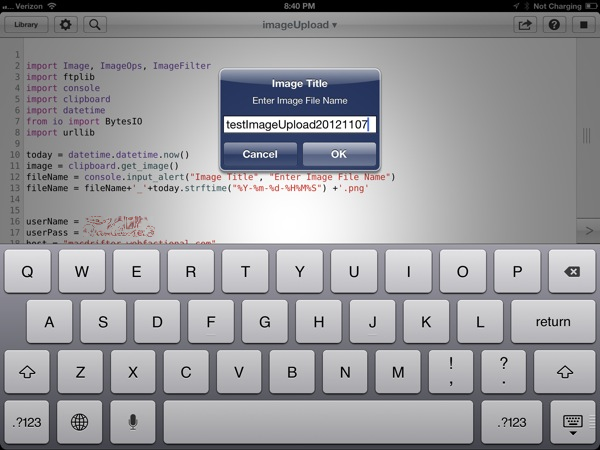
Here’s an example that I made. This script reads an image off of the iOS pasteboard. It then resizes the image proportionally to have a 600px width. Finally, after asking for a file name, it uploads the image to my FTP server here at Macdrifter and puts a URL to the image back on my pasteboard.
:::Python
import Image, ImageOps, ImageFilter
import ftplib
import console
import clipboard
import datetime
from io import BytesIO
import urllib

today = datetime.datetime.now()
image = clipboard.get_image()
fileName = console.input_alert("Image Title", "Enter Image File Name")
fileName = fileName+'_'+today.strftime("%Y-%m-%d-%H%M%S") +'.png'


userName = "myUserName"
userPass = "myPassWord"
host = "macdrifter.webfactional.com"
port = 22
urlBase = "http://www.macdrifter.com/uploads/"


remotePath = "/home/macdrifter/webapps/pelican/uploads/"


datePath = today.strftime("%Y/%m/")
# Used to create full remote file path
remoteFilePath =  remotePath + datePath


def customSize(img):
    w, h = img.size
    print 'w: ' + str(w)
    print 'h: '+ str(h)
    if w > 600:
        wsize = 600/float(w)
        print 'wsize: '+str(wsize)
        hsize = int(float(h)*float(wsize))
        print 'hsize: ' + str(hsize)

        img = img.resize((600, hsize), Image.ANTIALIAS)
    return img

image = customSize(image)
print image.size
image.show()


buffer = BytesIO()
image.save(buffer, 'PNG')
buffer.seek(0)

print remoteFilePath
print fileName

fileURL = urllib.quote(fileName)

ftp = ftplib.FTP(host, userName, userPass)
ftp.cwd(remoteFilePath)
ftp.storbinary('STOR '+fileName, buffer)
ftp.quit()
imageLink = urlBase+datePath+fileURL
print(imageLink)
clipboard.set(imageLink)
Through the use of Pythonista’s console library, I’m able to use standard iOS text inputs and alerts.
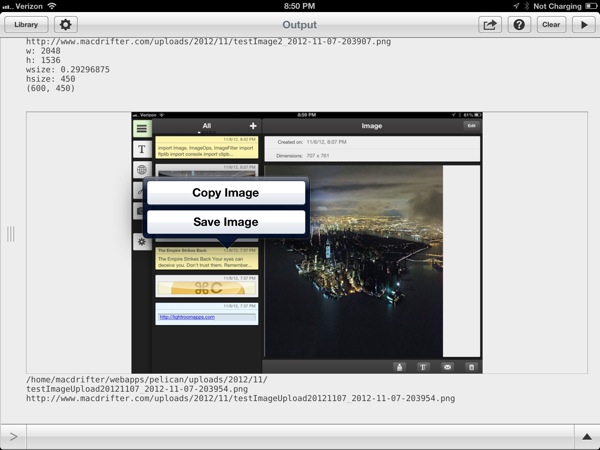
When the script runs, the console not only shows me my output values such as the new old and new dimensions but also the newly resized image. Tapping and holding on the image in the console allows me to copy it to the pasteboard or save it to my camera roll.
There you have it. Pythonista is my Keyboard Maestro on iOS. Making little utility macros is easy with Pythonista and the programming environment is luxurious. The code completion is excellent, the syntax highlighting is attractive and functional.
Markdown
Pythonista 1.2 adds the Markdown library. Just about anything that Python Markdown can do on the Mac, I can now do on iOS. I still use this heckyesmarkdown trick but I plan to rewrite it with some new Markdown tricks.
BeautifulSoup
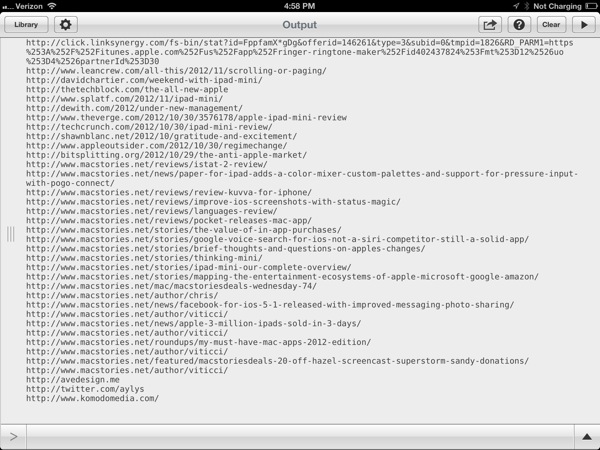
Pythonista adds its own variation of BeautifulSoup, the Python library for working with HTML. There’s some fun stuff that can be done. For example, here’s a Pythonista script that extracts all URL’s from the a given page. To use this script, I copy a URL to my iOS clipboard and then run the script. The console captures every URL found.
Here’s the code1
:::Python
# get_links.py
# https://pythonadventures.wordpress.com/2011/03/10/extract-all-links-from-a-web-page/

import re
import sys
import urllib
import urlparse
from bs4 import BeautifulSoup
import clipboard

class MyOpener(urllib.FancyURLopener):
    version = 'Mozilla/5.0 (Windows; U; Windows NT 6.1; en-US; rv:1.9.2.15) Gecko/20110303 Firefox/3.6.15'

def process(url):
    myopener = MyOpener()
    #page = urllib.urlopen(url)
    page = myopener.open(url)

    text = page.read()
    page.close()

    soup = BeautifulSoup(text)
    for tag in soup.findAll('a', href=True):
        tag['href'] = urlparse.urljoin(url, tag['href'])
        print tag['href']
# process(url)

def main():
    clipText = clipboard.get()
    print clipText
    process(clipText)
# main()

if __name__ == "__main__":
    main()
Code Sharing
Code snippets can now be directly uploaded to GitHub from Pythonista. This is a very convenient way to share code with your friends, like I’ve been doing with Federico Viticci during the beta testing.
Getting code into the app can be more difficult. Apple restricts apps from directly importing new code and executing it. It’s a security measure that I generally agree with. However, with just a little Python, Pythonista can import code from a GitHub link on the clipboard. The script is not available by default, so get it here.
URL Scheme
Pythonista adds a new URL scheme so other apps can launch Pythonista and run a named script with parameters. That’s pretty powerful stuff.
The URL scheme also means specific scripts can be saved to the home screen as a quick launch tool. Just visit this handy tool the developer provides to easily create one, complete with an attractive Pythonista icon that looks right at home on my iPad.
Forums
There is now a Pythonista forum. Users can share code, ideas, or pretty much anything.
The forums are already filling up with amazing examples (thanks to the developer). It’s hard to believe all of this can happen on an iPhone or iPad. For example, turn any device into a web server or a script that uses the Python Dropbox module to list, upload and download files.
Limits
My only real complaint is that Pythonista does not have a better way to organize code. I have a lot of scripts now and they are shown as a single list. I’d love folders.
iOS limits how Pythonista can be used. I already mentioned the restriction against automatic side-loading of code. There are also limits of making the run-time available to other apps. That means Pythonista must still be directly launched to use a script. It can not be used as a framework for other apps.
Ole Zorn (omz software) is the developer of Pythonista and his attention to detail really shines in this app. It’s not just attention to design (the app is very pretty) but he also gets what Python users want. He adds useful libraries and subtle tricks to Pythonista in every update.
Conclusion
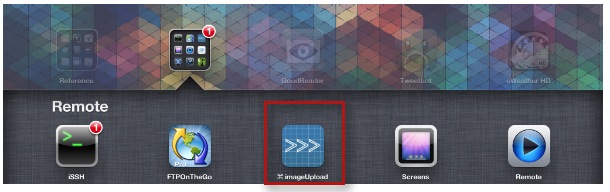
Here’s a shot of my iPad home screen:
And here’s a shot of my iPhone home screen:2
Notice something? Pythonista is strategically placed on the first row of the first home screen of both devices. Enough said.
Pythonista | Universal | $5
-
Yes, lots of notifications. Never bothers me. I have bigger worries than red circles. Also, a dead battery is a sign of hard work. I’ll own that. ↩︎